Download the Teacher Quick-Start Guide PDF.
To see the full Type to Learn teacher’s guide, click here. All Type to Learn support articles are available in our Support Knowledge Base. In-depth video training available from our Video Training Library.
Basic Terminology:
- Building: Any building where Type to Learn will be used, such as a single elementary school. Your account can have multiple buildings, which is typical for district accounts.
- Group: This can be any grouping of students you may want, but it typically indicates a single classroom or teacher. Students and teachers belong to groups, and teachers can only see reports and manage students within their Group.
- Admin Area: This refers to the area teachers and admins log in to view reports, manage users and adjust settings.
- The Program: This is the Type to Learn program students use.
- Level: A grouping of tasks a student will complete to learn new letters, practice those letters and confirm mastery. These tasks include a Lesson, Activities and the Final Challenge.
- License: A license covers one student’s use of Type to Learn. Teachers and admins do not use a license. If you delete a student, that license can be used for a new student.
Read more about the Type to Learn terminology.
Set Up in Four Steps:
Your account should already have at least one building created for you. You’ll see this listed on the Buildings page. If you do not see a building, or you need to create more, click here.
- Plan out your Groups so you know which students and teachers should be grouped together and how you want to name those Groups in Type to Learn.
- Add students to the account and organize them into Groups. You can add students one-by-one, or via import. More about adding students below.
- If you plan to use Clever or ClassLink for Rostering, you can skip this step.
- Adjust any TTL settings you may want to adjust on your Groups of students.
- Share the usernames and passwords with your students.
Admins, teachers and students all log in at: https://www.typetolearn.com/login/
Adding Students
You can add students to Type to Learn one-by-one, but we strongly recommend doing an import so it is quick and easy. An import template is available for download on the Import Users page in the Admin Area.
Learn more about Importing Users.
Important Notes When Importing:
- Create ALL buildings before importing any users.
- Usernames MUST be unique between all users in your account (regardless of building). Usernames can include lowercase letters, numbers, periods and the @ symbol.
- The minimum required fields for import are: username, password, first name, last name, building1 and role1.
- Groups will be created automatically during the import if you included a Group Name in the spreadsheet that was not already created in Type to Learn.
- Do NOT change the order of or remove any columns from the import template. If you are not importing any data in a certain column, leave the column in the file and leave the cells blank.
- We recommend Teachers have an email address included, but students should not. Unless you plan to use Clever or ClassLink for SSO, then an email address will be required.
- The four role type options are: Organization Admin, Building Admin, Teacher, and Student.
- Be sure to include Teachers in their own groups.
- A student’s default settings will be based on their grade, so we highly recommend including a grade for each student. For teachers and admins, you can leave the grade blank.
Note: Type to Learn also integrates with Clever and ClassLink for single-sign-on and rostering. Rostering with an integration allows you to skip the import process.
What are the Default Settings?
There are three grade tiers, each with their own Default Settings that take effect when a student is added. You can change the default settings at any point if you need to. For most students, the recommended default settings will work great. The grade tiers are:
- Young/Beginner Students (K-2)
- Intermediate Students (3-6)
- Older/Advanced Students (7-12)
Below are some default settings that apply to all students, regardless of grade. You can always adjust these settings at any time.
- A Pre-Test assessment is required before starting any Lessons.
- All activities are required after the Lesson is complete.
- The Assessment time limit is 5 minutes.
- WPM and Accuracy Goals are initially set based on the Pre-Test and adjusted throughout the program based on Assessment results.
- For grades 3-12, Lessons A and B are disabled.
About the Program
In Type to Learn there are Levels and Assessments. There are three parts to each Level: the Lesson, the Activities, and the Final Challenge. In order for a student to move on to the next Level, they must pass all required tasks within the Level.
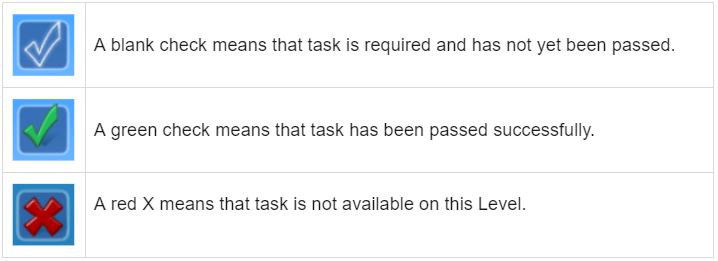
What does “passing” a task mean?
In order to pass a task, the student must reach their Accuracy goal OR at least their goal minimums (see below). We only check Accuracy for passing because speed can be difficult to achieve early on, and it’s more important to be accurate than fast when learning to type.
Read More in Everything You Need to Know about Passing (or Failing) Levels.
Default/Suggested Goals for Each Grade Tier:
- K-2: 6 WPM and 60% Accuracy
- 3-6: 15 WPM and 85% Accuracy
- 7-12: 20 WPM and 85% Accuracy
Goals are initially set after the Pre-Test is completed and are based on the Pre-Test results. You can change these goals later in the TTL Settings area to be based on their Grade Level, or a manual entry.
What are goal minimums?
We use goal minimums to prevent frustration in students not being able to progress through the program. A student can pass a task without hitting their personal goals by hitting at least the goal minimums. The goal minimums are -7 WPM and -10% Accuracy off their normal goals. Think of the goal minimums as receiving a B grade, while hitting their goals would be an A+.
The Pre-Test and Assessments
The Pre-Test is the first thing any student will do when starting with Type to Learn, and it is required by default. Students should take this seriously and try their best, as the result will determine what lesson they start on and their starting goals. Assessments are timed tests that check the student’s progress after groups of Levels. The default assessment length is 5 minutes. The student’s WPM and Accuracy goals are adjusted after each assessment based on their Assessment results (goals are never adjusted down).
What are Lessons A & B?
These two lessons are only recommended for young students with very little experience with a keyboard (usually grades K-2). The lessons start out very easy and require repetition of each key on the keyboard. However, they also have the students typing words, with a focus on using the correct hand for each letter. They are meant to help bring awareness to the keyboard and the position of the letters, they are NOT meant to teach proper touch typing.
A Few Final Notes:
- You are able to turn off the sounds either in the settings area or in the Options menu within the program. However, the tone heard when an incorrect letter is pressed can help with Accuracy, because students realize they’ve hit an incorrect letter before accidentally typing additional letters afterwards.
- If you disable the Pre-Test in the settings, you can then choose the Level a student will start on. This is helpful for more advanced students.
- Don’t forget about our ESL setting and the option to add Custom Content. If interested, let us know and we’ll tell you more.
Support Resources:
Call or email support any time you have a question or problem:
support@sunburst.com, 800-321-7511, option 2.


